Free printable cheat sheet · 15 topics
Mixing & Mastering Cheat Sheet
Follow your song along the map, from the first fader to the final file. Every stop has the numbers to start from.
By DJ H3MP · Updated November 2026
Want the why behind the numbers? Read mixing and mastering for beginners (free guide).
The signal path
Stop 1 of 9 · Mixing
Before you mix: quick setup checklist
Set up your listening and your files before the first fader moves.
- Monitor at a moderate level; turn up only for quick checks.
- Speakers and your head form an equal triangle, tweeters at ear height.
- Rest your ears about 10 minutes every hour.
- Load 2–3 reference songs in your genre.
- Record 24-bit WAV at 44.1 or 48 kHz, with no clipping.
Why it works: Before you start: your room, monitors and headphones
- Listening level
- About 70–80 dB SPL (a little louder than conversation)
- Breaks
- About 10 minutes every hour
- References
- 2–3 songs in your genre
- Recording format
- 24-bit WAV, 44.1 or 48 kHz
- Speakers
- An equal triangle, tweeters at ear height
Stop 2 of 9 · Mixing
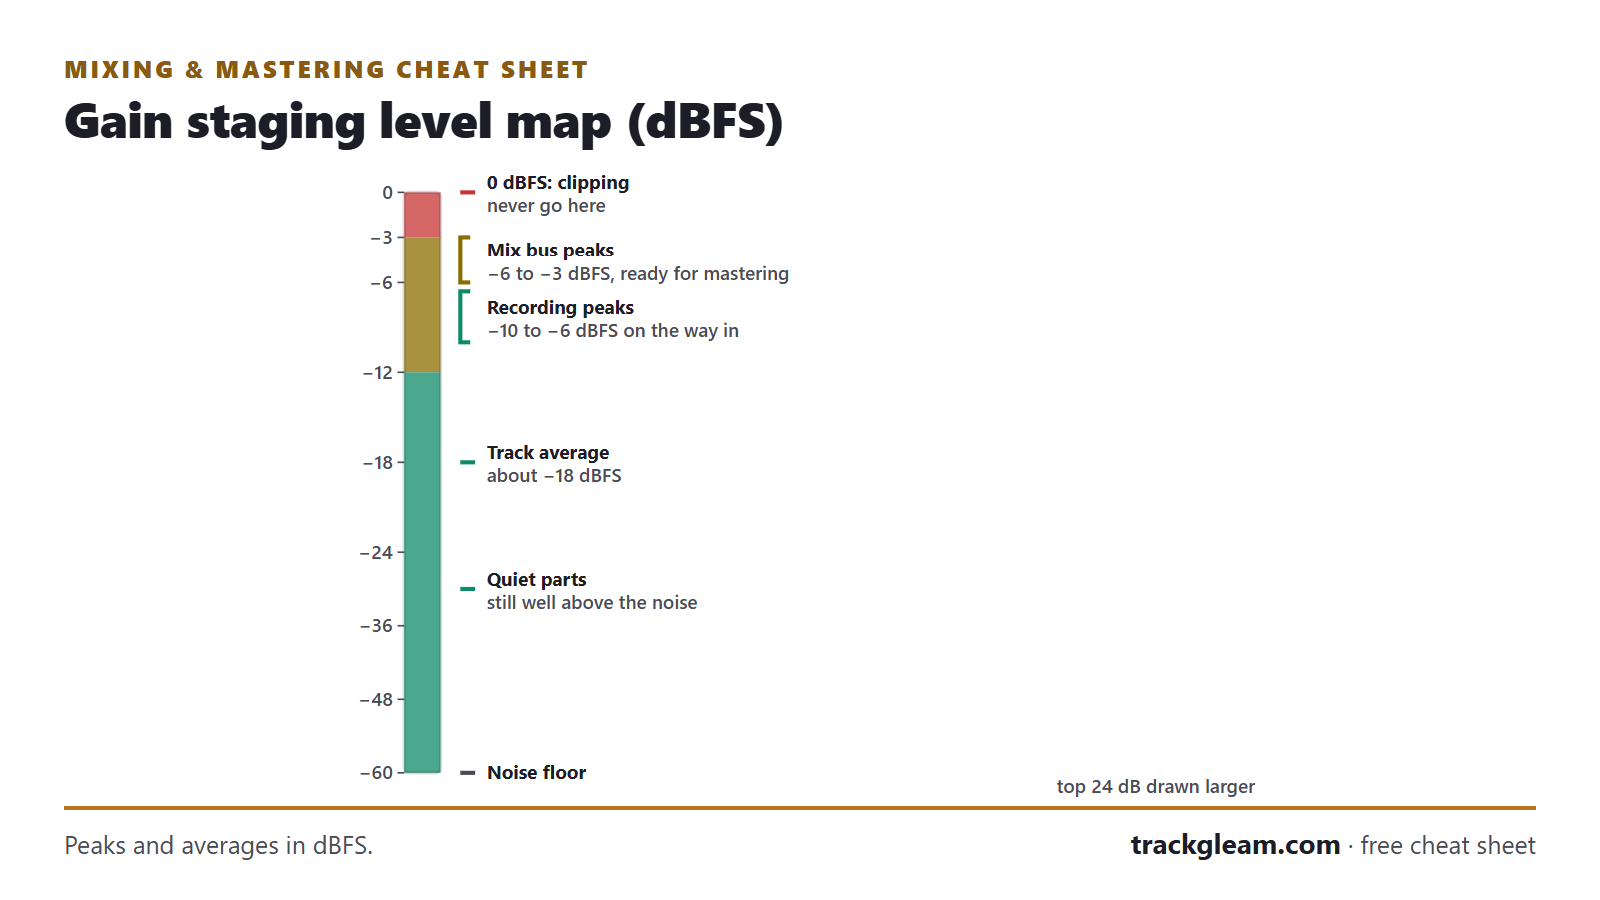
Gain staging cheat sheet
Healthy levels into every plugin and every bus, from the first take to the mix bus.
- Recording peaks: −10 to −6 dBFS.
- Track average: about −18 dBFS, set with clip gain or a trim.
- Faders start near 0; balance with small moves.
- Mix bus peaks: −6 to −3 dBFS, never 0.
- Level-match any plugin before you judge it.
Why it works: Gain staging, explained
- Recording peaks
- −10 to −6 dBFS
- Track average
- About −18 dBFS (RMS)
- Mix bus peaks
- −6 to −3 dBFS
- Bit depth
- 24-bit (or 32-bit float)
- Never
- 0 dBFS on the mix bus (clipping)
Stop 3 of 9 · Mixing
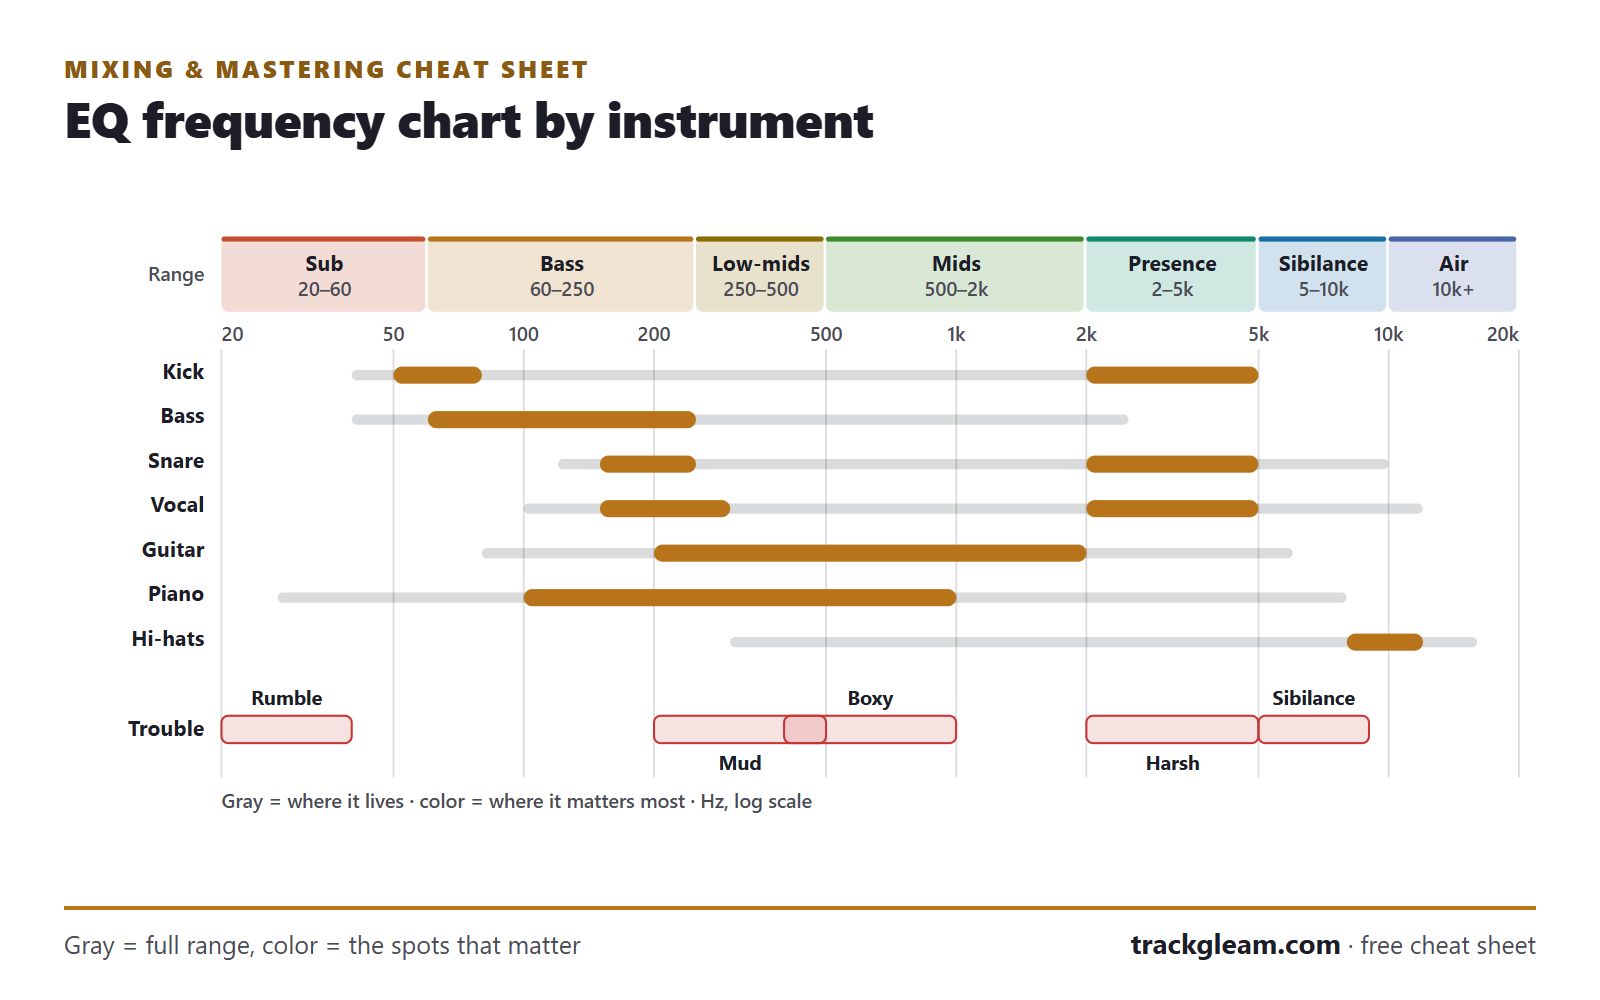
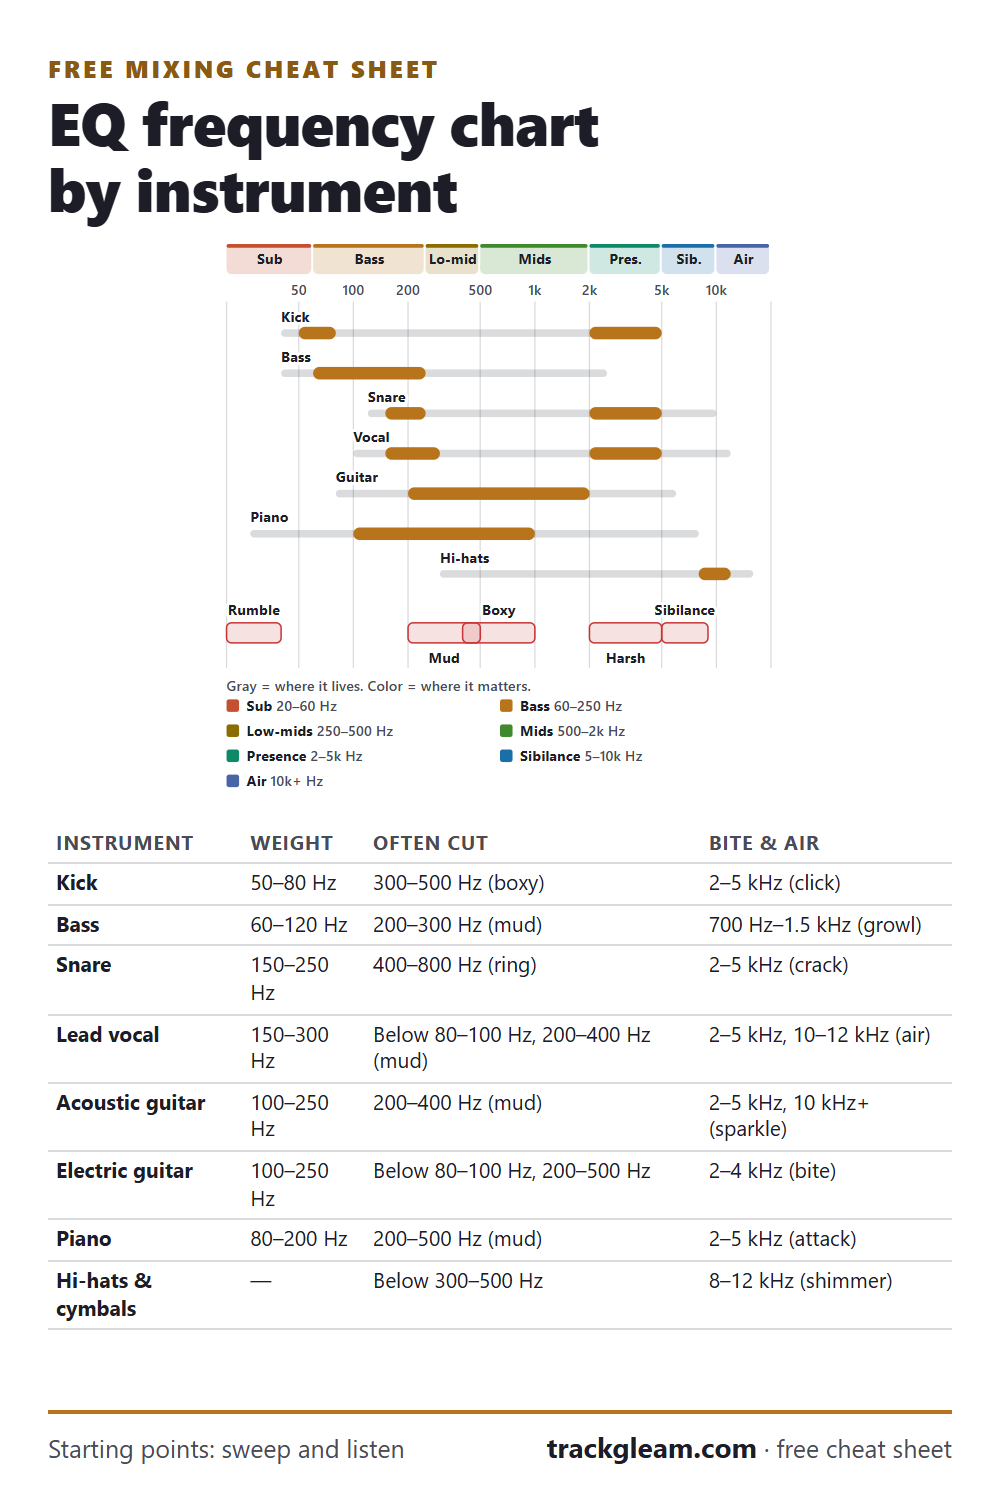
EQ cheat sheet: frequency chart by instrument
Use EQ to make room: cut what crowds the mix, boost only what is missing.
- Cuts narrow, boosts wide.
- High-pass vocals, guitars and keys from 80–100 Hz.
- Mud 200–500 Hz · harsh 2–5 kHz · sibilance 5–9 kHz.
- Decide with the whole mix playing, never in solo.
- Stay within 2–3 dB; bigger fixes belong at the source.
Why it works: How to EQ a mix
- High-pass vocals
- 80–100 Hz
- Mud cut
- 250–400 Hz, −2 to −4 dB
- Presence boost
- 2–5 kHz, +1 to +3 dB
- Air shelf
- 10–12 kHz, +1 to +2 dB
- Q (width)
- Cuts 2–4, boosts 0.7–1
EQ frequency chart by instrument
| Instrument | Weight | Often cut | Bite & air |
|---|---|---|---|
| Kick | 50–80 Hz | 300–500 Hz (boxy) | 2–5 kHz (click) |
| Bass | 60–120 Hz | 200–300 Hz (mud) | 700 Hz–1.5 kHz (growl) |
| Snare | 150–250 Hz | 400–800 Hz (ring) | 2–5 kHz (crack) |
| Lead vocal | 150–300 Hz | Below 80–100 Hz, 200–400 Hz (mud) | 2–5 kHz, 10–12 kHz (air) |
| Acoustic guitar | 100–250 Hz | 200–400 Hz (mud) | 2–5 kHz, 10 kHz+ (sparkle) |
| Electric guitar | 100–250 Hz | Below 80–100 Hz, 200–500 Hz | 2–4 kHz (bite) |
| Piano | 80–200 Hz | 200–500 Hz (mud) | 2–5 kHz (attack) |
| Hi-hats & cymbals | — | Below 300–500 Hz | 8–12 kHz (shimmer) |
Starting points. Every recording is different, so sweep and listen.
Problem frequencies
| Problem | Where | Try |
|---|---|---|
| Rumble | 20–40 Hz | High-pass it |
| Mud | 200–500 Hz | Cut 2–4 dB |
| Boxy | 400 Hz–1 kHz | Narrow cut |
| Honky, nasal | 800 Hz–1.5 kHz | Narrow cut |
| Harsh | 2–5 kHz | Small cut |
| Sibilance | 5–9 kHz | De-esser |
| Hiss, fizz | 10 kHz+ | Gentle shelf down |
Stop 4 of 9 · Mixing
Compression settings cheat sheet
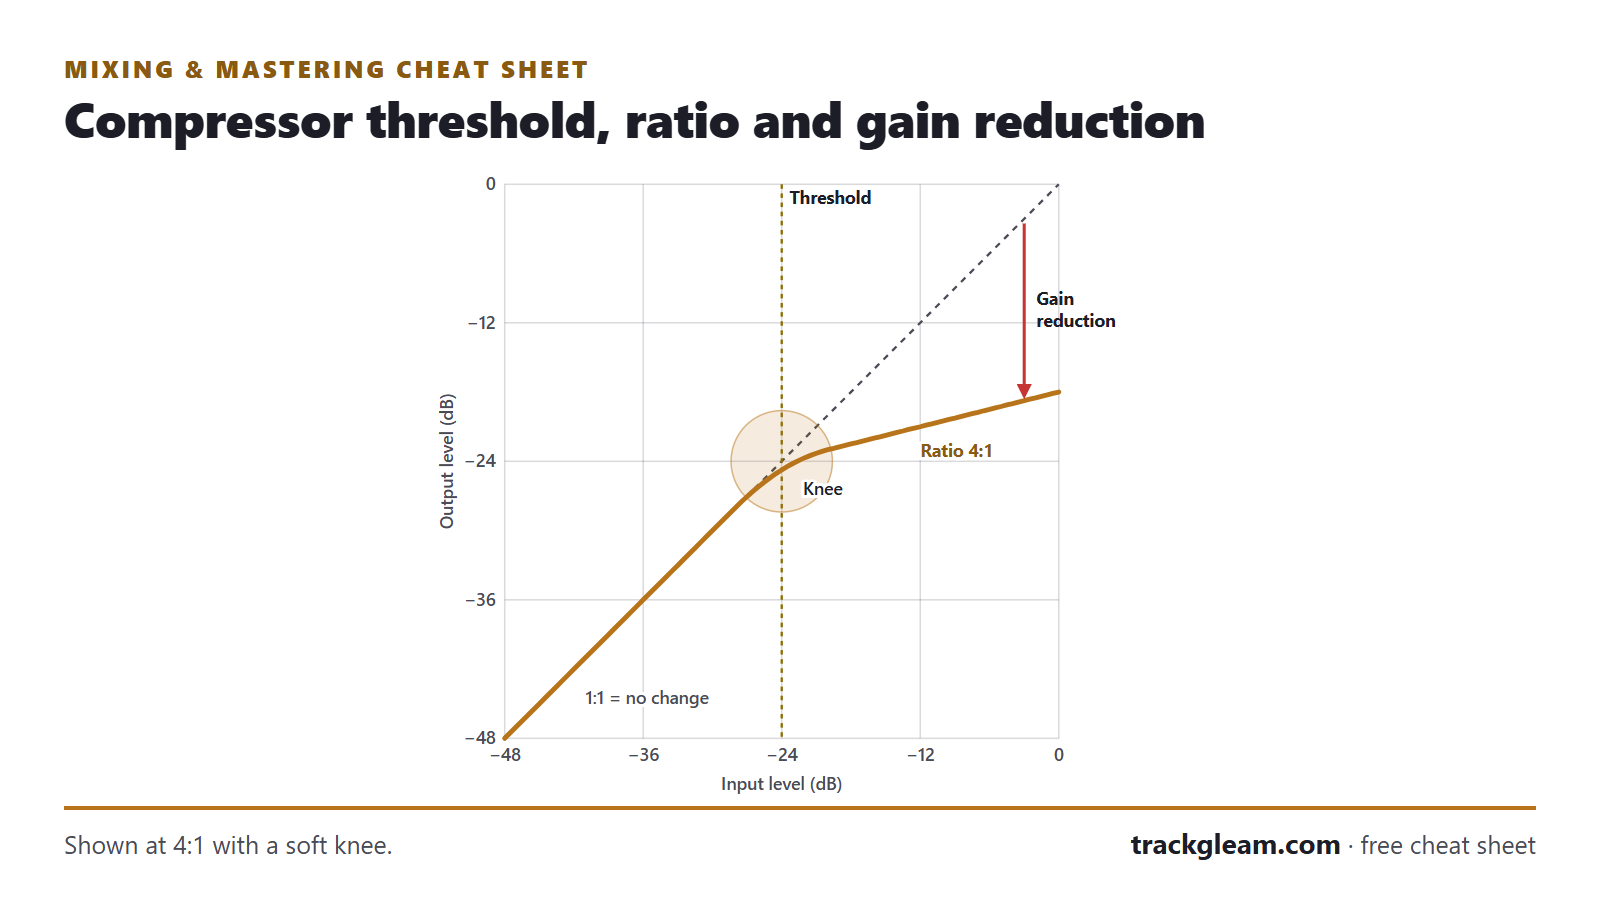
Above the threshold a compressor turns the sound down, to steady it or to shape its punch.
- Lower the threshold until you see a few dB of gain reduction.
- Ratio: 2:1 gentle, 4:1 firm, 10:1 and up is limiting.
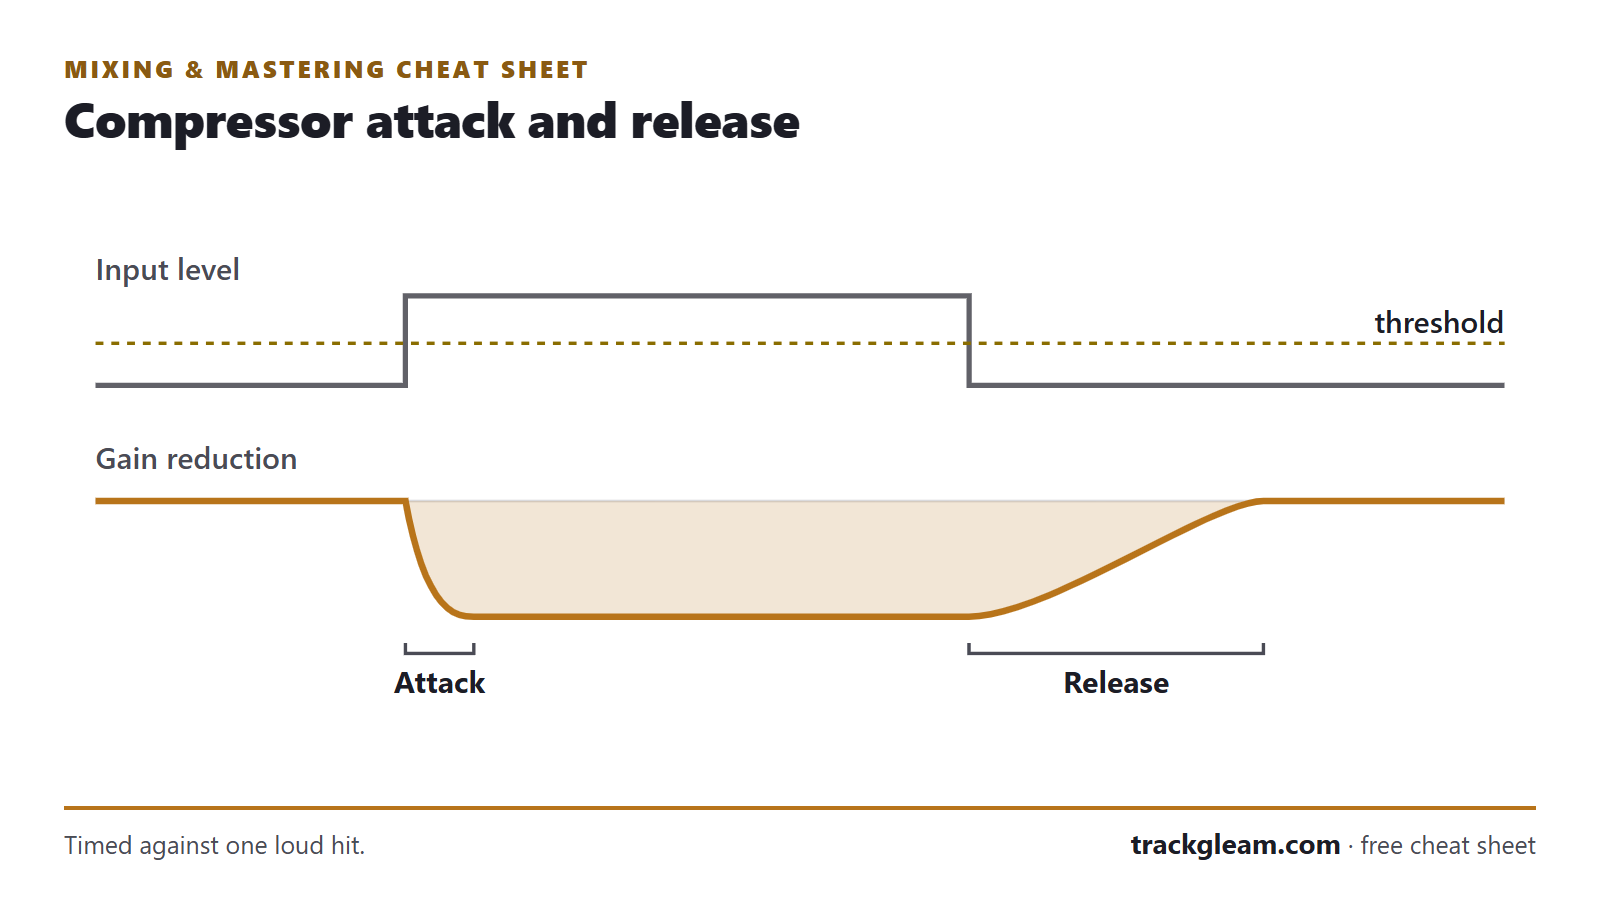
- Attack 10–30 ms keeps the punch; under 5 ms tames it.
- Release recovers before the next hit.
- Match the output with makeup gain, then bypass to compare.
Why it works: How to use compression
- Gentle
- 2:1, 1–3 dB of reduction
- Firm
- 4:1, 3–6 dB of reduction
- Punchy attack
- 10–30 ms
- Fast attack
- Under 5 ms
- Release
- 50–100 ms, or timed to the groove
Compression settings by instrument
| Source | Ratio | Reduction | Attack | Release |
|---|---|---|---|---|
| Lead vocal | 3:1–4:1 | 3–6 dB | 5–15 ms | 50–100 ms |
| Bass | 4:1 | 3–6 dB | 10–30 ms | 50–100 ms |
| Kick | 4:1 | 3–5 dB | 10–30 ms | 50–100 ms |
| Snare | 3:1–4:1 | 3–5 dB | 5–20 ms | 50–100 ms |
| Acoustic guitar | 2:1–3:1 | 2–4 dB | 10–20 ms | About 100 ms |
| Drum bus | 2:1–4:1 | 2–3 dB | 10–30 ms | Timed to the groove |
| Mix bus | 1.5:1–2:1 | 1–2 dB | About 30 ms | Auto |
Starting points. Trust your ears.
Stop 5 of 9 · Mixing
Reverb settings & delay time calculator
Reverb places a sound in a space; delay repeats it in time with the song.
- Reverb and delay live on sends, not inserts.
- Room = tight, plate = vocals and snare, hall = big and slow.
- Pre-delay of 20–60 ms keeps the vocal up front.
- High-pass the reverb return at 200–300 Hz.
- Quarter-note delay in ms = 60,000 ÷ BPM.
Why it works: How to use reverb and delay
- Quarter note
- 60000 / BPM ms (500 ms at 120 BPM)
- Pre-delay
- 20–60 ms
- Vocal plate
- 1.2–2 s decay
- Reverb return
- High-pass 200–300 Hz
- Slapback
- 80–120 ms, one repeat
Reverb types
| Type | Decay | Sounds like | Great on |
|---|---|---|---|
| Room | 0.3–1 s | Tight and natural | Drums, guitars, a dry vocal |
| Plate | 1–2.5 s | Smooth and bright | Vocals, snare |
| Hall | 1.5–3 s+ | Big and slow | Ballads, strings, pads |
Delay time calculator (BPM to ms)
At 120 BPM
Delay in ms = 60,000 ÷ BPM. At 120 BPM a quarter note is 500 ms and a dotted eighth is 375 ms.
Stop 6 of 9 · Mixing
Panning & stereo width cheat sheet
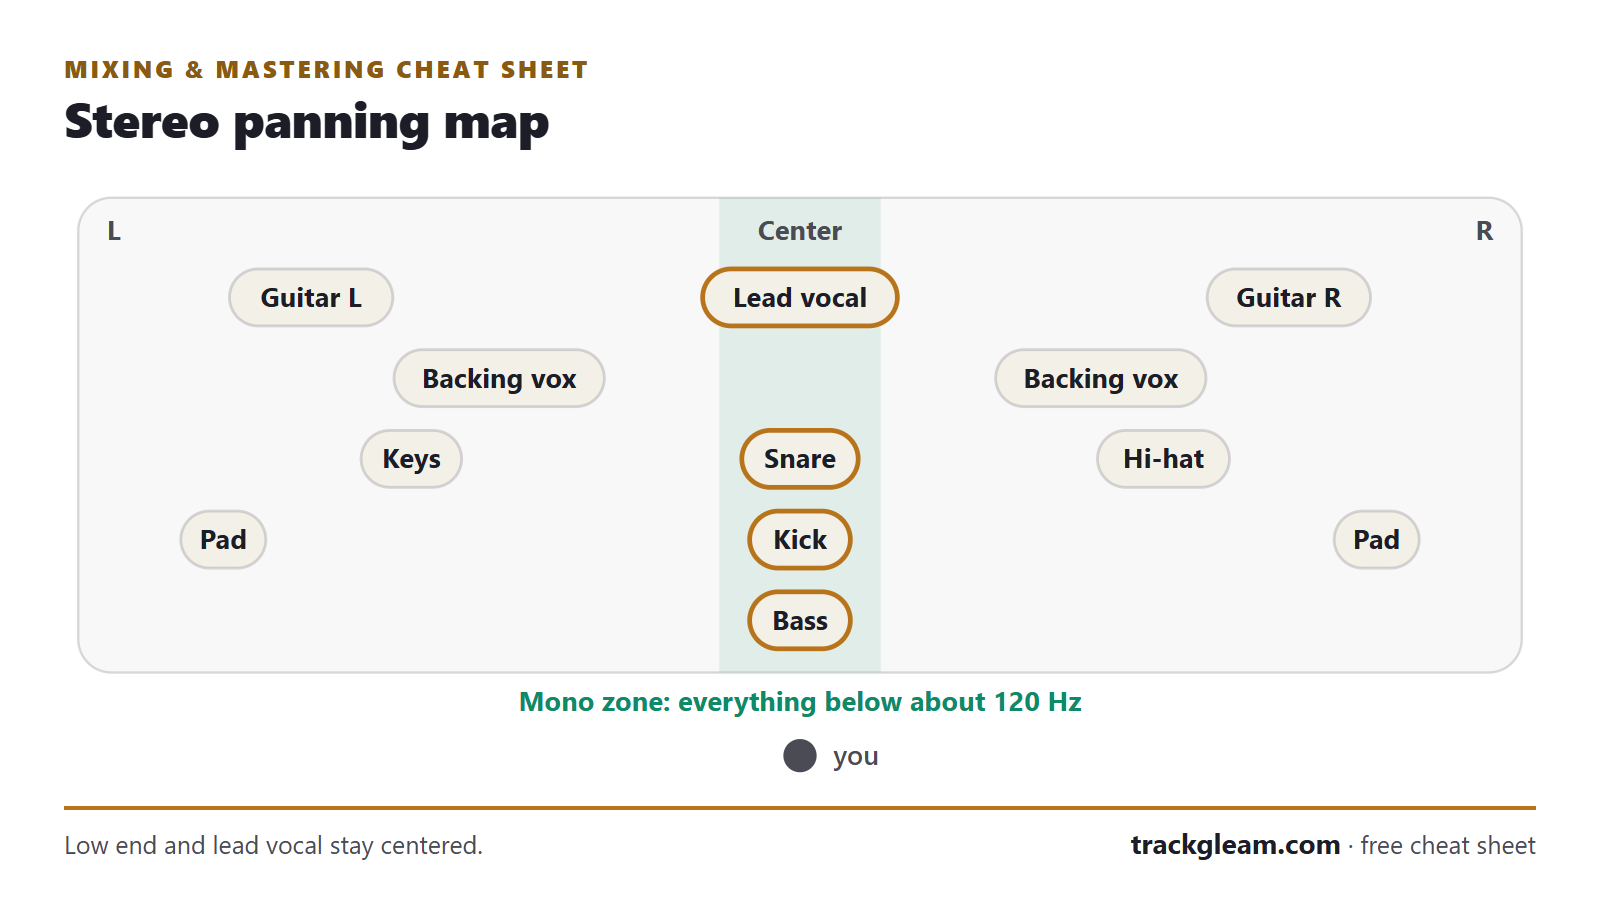
Spread sounds from left to right, and keep the song solid in mono.
- Center: kick, snare, bass, lead vocal.
- Doubles and backing vocals go out in left-right pairs.
- Everything under 100–120 Hz stays in the middle.
- Flip to mono every 15–20 minutes.
- Go easy on widener plugins.
Why it works: How to pan and set stereo width
- Center
- Kick, snare, bass, lead vocal
- Pairs
- 50–100% left and right
- Mono check
- Every 15–20 minutes
- Mono low end
- Below about 100–120 Hz
- Correlation (phase) meter
- Mostly above 0
Stop 7 of 9 · Mixing
Bus & glue compression settings
A bus sums a group of tracks, so one fader or one compressor treats them together.
- Drum bus: 2–3 dB of compression.
- Mix bus glue: 1.5:1–2:1, 1–2 dB, slow attack.
- Give backing vocals, guitars or synths a bus of their own.
- Keep the limiter off the mix bus when it goes to mastering.
Why it works: Mixing in groups: buses and glue
- Drum bus
- 2:1–4:1, 2–3 dB, attack 10–30 ms
- Mix bus
- 1.5:1–2:1, 1–2 dB, attack about 30 ms
- Release
- Auto, or timed to the groove
- Limiter
- Off when it goes to mastering
Stop 8 of 9 · Mastering
Mastering chain order
Mastering polishes the finished stereo mix and sets its final loudness.
- Order: EQ, compression, optional saturation, stereo check, limiter.
- EQ moves of 0.5–2 dB; compression of 1–2 dB.
- Limiter last, ceiling at −1.0 dBTP.
- Compare against the mix at matched loudness.
- Dither only at the very end, when the bit depth drops.
Why it works: How to build a mastering chain
- EQ moves
- 0.5–2 dB, wide
- Compression
- 1.5:1–2:1, 1–2 dB of reduction
- Limiter ceiling
- −1.0 dBTP
- Target
- −11 LUFS (or −14 streaming-safe)
The chain, in order
- EQbroad, 0.5–2 dB
- Compressglue, 1–2 dB
- Saturateoptional warmth
- Stereowidth check, mono lows
- Limit−11 LUFS, −1.0 dBTP
Where Gleam and GleamAI fit
Stop 8 of 9 · Mastering
Loudness by platform
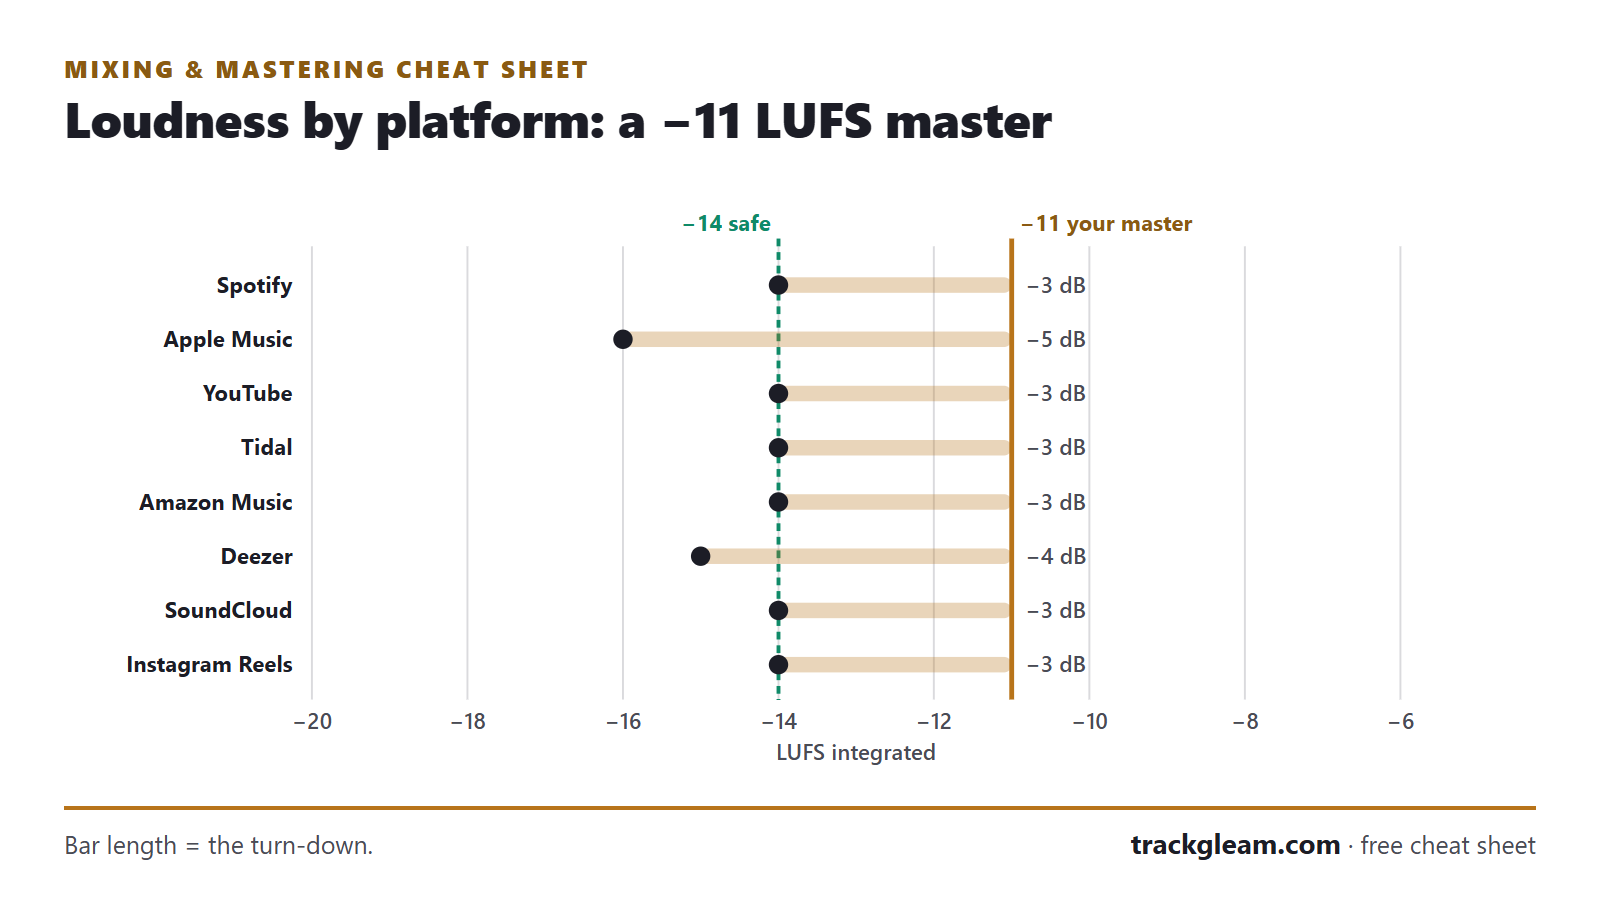
LUFS is loudness over the whole song; dBTP is the true peak after conversion.
- Release default: −11 LUFS integrated, −1.0 dBTP.
- Streaming-safe: −14 LUFS, no turn-down.
- Amazon Music caps peaks at −2.0 dBTP; Spotify asks the same above −14 LUFS.
- Measure integrated loudness over the full song.
- One master works on every service.
Why it works: Loudness and LUFS, explained
- Release default
- −11 LUFS, −1.0 dBTP
- Streaming-safe
- −14 LUFS, −1.0 dBTP
- Amazon Music ceiling
- −2.0 dBTP
- Your mix before mastering
- No limiter, peaks −6 to −3 dBFS
Playback level and peak ceiling
| Platform | Plays atLUFS | Peak ceilingdBTP | Your −11turned down |
|---|---|---|---|
| SpotifyAsks for −2.0 dBTP on masters louder than −14 LUFS | −14 | −1.0 | −3 dB |
| Apple MusicAbout −16 (Sound Check) | −16 | −1.0 | −5 dB |
| YouTubeTurns loud songs down, never up | −14 | −1.0 | −3 dB |
| TidalLevels by album | −14 | −1.0 | −3 dB |
| Amazon MusicThe strictest peak ceiling | −14 | −2.0 | −3 dB |
| DeezerOne LU quieter than the −14 group | −15 | −1.0 | −4 dB |
| SoundCloudSources still disagree; do not master hot for it | −14 | −1.0 | −3 dB |
| Instagram ReelsAbout −14, leveled | −14 | −1.0 | −3 dB |
| TikTok feedNot leveled: the file plays as it is | none | −1.0 | plays as is |
Measured playback levels as of July 2026; Apple Music, SoundCloud and Instagram are approximate.
Sources: Spotify for Artists; the other levels are widely published measurements, gathered in our full loudness guide. Updated November 2026.
Stop 9 of 9 · Mastering
Export settings + final checklist
Two files to get right: the mix for mastering and the master for release.
- Mix: 24-bit WAV, session sample rate, peaks −6 to −3 dBFS, no limiter.
- Master: 24-bit WAV; 16-bit with dither for CD.
- Never normalize the export.
- Let the last tail ring out.
- MP3 at 320 kbps is for previews only.
Why it works: How to export your mix and master
- Mix file
- 24-bit WAV, same sample rate as the session
- Mix peaks
- −6 to −3 dBFS, no limiter
- Master file
- 24-bit WAV (16-bit for CD, with dither)
- Preview file
- MP3, 320 kbps
Export settings by file
| File | Format | Notes |
|---|---|---|
| Mix for mastering | 24-bit (or 32-bit float) WAV, session sample rate | No limiter, no normalize, peaks −6 to −3 dBFS |
| Master for streaming | 24-bit WAV, 44.1 kHz or higher | Check what your distributor accepts; −1.0 dBTP ceiling |
| Master for CD | 16-bit, 44.1 kHz WAV | Dither when you go down to 16-bit |
| Preview or sharing | MP3, 320 kbps | Not for your distributor |
Before you export
- Mix bus peaks around −6 to −3 dBFS, with no clipping on any bus
- Played once in mono: nothing disappears
- Checked on earbuds and a phone speaker
- Compared with a reference at matched loudness
- Fade-ins, fade-outs and the last tail are clean
- Exported at the session sample rate, 24-bit
- Dither only on the final 16-bit file
- No limiter and no normalize on the mix you send to mastering
- File named clearly: artist, title, and mix or master
Side trip · Topic 7
Vocal chain cheat sheet: EQ & compression
The usual vocal chain: clean, EQ, compress, de-ess, then add space on sends.
- Clean breaths and noise, then high-pass at 80–100 Hz.
- Ride the level by hand first, then compress at 3:1–4:1.
- Two light compressors of about 3 dB each beat one heavy one.
- De-ess at 5–9 kHz for 2–4 dB.
- Every word clear at low volume.
Why it works: How to mix vocals
- Mix Vocals Over a Beat Got a beat and a vocal take? It lines them up and balances them free in your browser.
- High-pass
- 80–100 Hz
- Compression
- 3:1–4:1, 3–6 dB of reduction
- De-esser
- 5–9 kHz, 2–4 dB
- Plate reverb
- 1.2–2 s, 20–60 ms pre-delay
- Level check
- Every word clear at low volume
Vocal chain order
- Cleanedit noise and breaths, high-pass 80–100 Hz
- EQcut mud, add a little presence
- Compress3:1–4:1, 3–6 dB
- De-ess5–9 kHz, 2–4 dB
- Spaceplate reverb and a timed delay, on sends
Side trip · Topic 8
Kick & bass EQ cheat sheet
Kick and bass share the bottom of the mix, so give each one its own job.
- Pick one owner for the deepest lows.
- The bass ducks under the kick, 2–4 dB.
- Mono below about 100–120 Hz.
- Tune 808s and bass to the key of the song.
- A touch of saturation helps bass read on phones.
Why it works: How to mix kick and bass
- Kick thump
- 50–80 Hz
- Bass body
- 60–250 Hz
- Bass on phones
- 700 Hz–1.5 kHz (its harmonics)
- Sidechain duck
- 2–4 dB, fast attack, release to the tempo
- Mono below
- About 100–120 Hz
Side trip · Topic 11
Reference track quick checks
Hold your mix against released songs you love, at the same loudness.
- Choose 2–3 songs in your style.
- Level-match within about 1 LU before you compare.
- Loop 10–20 seconds of the same section.
- One question per pass: lows, vocal, brightness or width.
- Use full-quality files and switch every few seconds.
Why it works: How to use reference tracks
- Match loudness
- Within about 1 LU
- Loops
- 10–20 seconds of the same section
- How many
- 2–3 references
- Switch
- Every few seconds
Side trip · Topic 14
Common mix mistakes & quick fixes
The slip-ups nearly everyone makes, each with its fix.
- Levels first, then EQ, then compression.
- One change at a time.
- Three playback systems before you call it done.
Why it works: Beginner mixing mistakes to avoid
- Fix first
- Levels, then EQ, then compression
- Check on
- Headphones, a car, a phone
- Headroom
- Mix bus peaks −6 to −3 dBFS
- Loudness
- About −11 LUFS, −1.0 dBTP
Mistake → fix
- Mixing too loud for too long
- Turn it down to conversation level and take breaks.
- Judging plugins at different volumes
- Match levels before you decide. Louder almost always sounds better at first.
- Too much low end you cannot hear
- Check on headphones and a phone, and look at a spectrum analyzer.
- Over-compressing
- Back off until the song breathes again. Watch the gain reduction meter.
- Wide bass
- Keep everything below about 100–120 Hz in mono.
- A clipping mix bus
- Pull the faders down and leave about 6 dB of headroom.
- EQing in solo
- Make EQ decisions with the whole mix playing.
- Too much reverb
- Turn the send up until you hear it, then back it off a little.
- A vocal buried in the beat
- Ride the vocal level and carve a little room for it with EQ.
- Mastering a mix that is not done
- Fix balance problems in the mix. Mastering only polishes.
- Chasing loudness
- Aim for about −11 LUFS. Much louder just gets turned down on streaming.
- Never comparing to a reference
- Level-match a released song and check against it every so often.
Side trip · Topic 15
Mixing & mastering glossary
The words that come up most, in plain English.
- dBFS: the level inside your computer, 0 is the ceiling.
- LUFS: loudness over time.
- dBTP: the true peak, between the samples too.
Why it works: Glossary of mixing terms
- Digital ceiling
- 0 dBFS
- Streaming level
- About −14 LUFS
- Release default
- About −11 LUFS
- True-peak ceiling
- −1.0 dBTP
A to Z
- Attack
- How fast a compressor starts turning the sound down once it crosses the threshold.
- Automation
- Fader or knob moves recorded into the song, like turning the vocal up in the chorus.
- Bit depth
- How finely each sample is measured. 24-bit leaves lots of room below the ceiling; 16-bit is the CD format.
- Bounce
- Rendering your mix or master to an audio file. Also called export.
- Bus
- A channel that several tracks feed into, like all the drums.
- Clipping
- When the level tries to go past the ceiling and the tops of the waveform get cut off. It sounds harsh.
- Compressor
- A tool that turns a sound down when it gets louder than the threshold, so the level stays more even.
- dB (decibel)
- The unit for level. 1 dB is a small change; about 10 dB sounds roughly twice as loud.
- dBFS
- Decibels relative to full scale: the level inside your computer. 0 dBFS is the ceiling.
- dBTP
- True peak. The real top of the waveform, including peaks that land between samples.
- De-esser
- A compressor that only reacts to sharp S and T sounds.
- Delay
- An echo of the sound, often timed to the beat.
- Dither
- Very quiet noise added when you lower the bit depth, so fades and quiet parts stay smooth.
- Dry / wet
- Dry is the untouched sound, wet is the effect. A mix knob blends the two.
- Dynamic range
- The difference between the quiet and loud parts of a song.
- EQ
- Equalizer. A tool that turns frequency ranges up or down.
- Frequency
- How low or high a sound is, in hertz (Hz). People hear from about 20 Hz to 20 kHz.
- Gain
- The level going into a track, a plugin or a device.
- Gain reduction
- How many dB a compressor or limiter is turning the sound down right now.
- Gain staging
- Setting healthy levels at every step, so nothing clips and every plugin behaves.
- Headroom
- The space between your loudest peak and 0 dBFS.
- High-pass filter
- Removes the lows below a set point and lets the highs pass.
- Insert
- An effect placed right on one track, so all of its sound goes through it.
- Integrated LUFS
- The loudness of the whole song from start to finish. The number streaming services use.
- Knee
- How gently a compressor starts working around the threshold.
- Limiter
- A fast compressor with a very high ratio that keeps peaks under a ceiling. It goes last in mastering.
- Low-pass filter
- Removes the highs above a set point and lets the lows pass.
- LRA (loudness range)
- How much the loudness moves between the quiet and loud parts, in LU.
- LUFS
- Loudness units relative to full scale. How loud a song feels over time.
- Makeup gain
- Level added after a compressor, so it is as loud as before.
- Mastering
- The last step: polishing the finished mix and setting its loudness for release.
- Mixing
- Balancing and shaping all the tracks of a song into one stereo file.
- Mono
- One channel: left and right added together.
- Mono compatibility
- How well your mix holds up when left and right are added together.
- Mud
- A cloudy, crowded sound, usually from too much 200–500 Hz.
- Normalization
- When a streaming service turns songs up or down so they play at about the same loudness.
- Panning
- Placing a sound between left and right.
- Phase
- The timing between two similar signals. Out of phase, they cancel each other and sound thin.
- Pre-delay
- A short gap before a reverb starts, so the dry sound stays clear and up front.
- Q
- How wide an EQ band is. A high Q is narrow, a low Q is wide.
- Ratio
- How hard a compressor turns down. At 4:1, a sound 4 dB over the threshold comes out 1 dB over.
- Reference track
- A released song you compare your mix to.
- Release
- How fast a compressor lets go once the sound drops back under the threshold.
- RMS
- A kind of average level. Closer to how loud something feels than the peak is.
- Sample rate
- How many times per second the audio is measured. 44.1 kHz and 48 kHz are the usual ones.
- Send / aux
- A side channel many tracks feed into, usually for reverb or delay.
- Sibilance
- Sharp S and T sounds in a vocal, usually around 5–9 kHz.
- Sidechain
- Letting one sound control a compressor on another, like the kick ducking the bass.
- Stem
- A group of tracks bounced together, like all the drums.
- Threshold
- The level where a compressor starts to work.
Save & share the charts
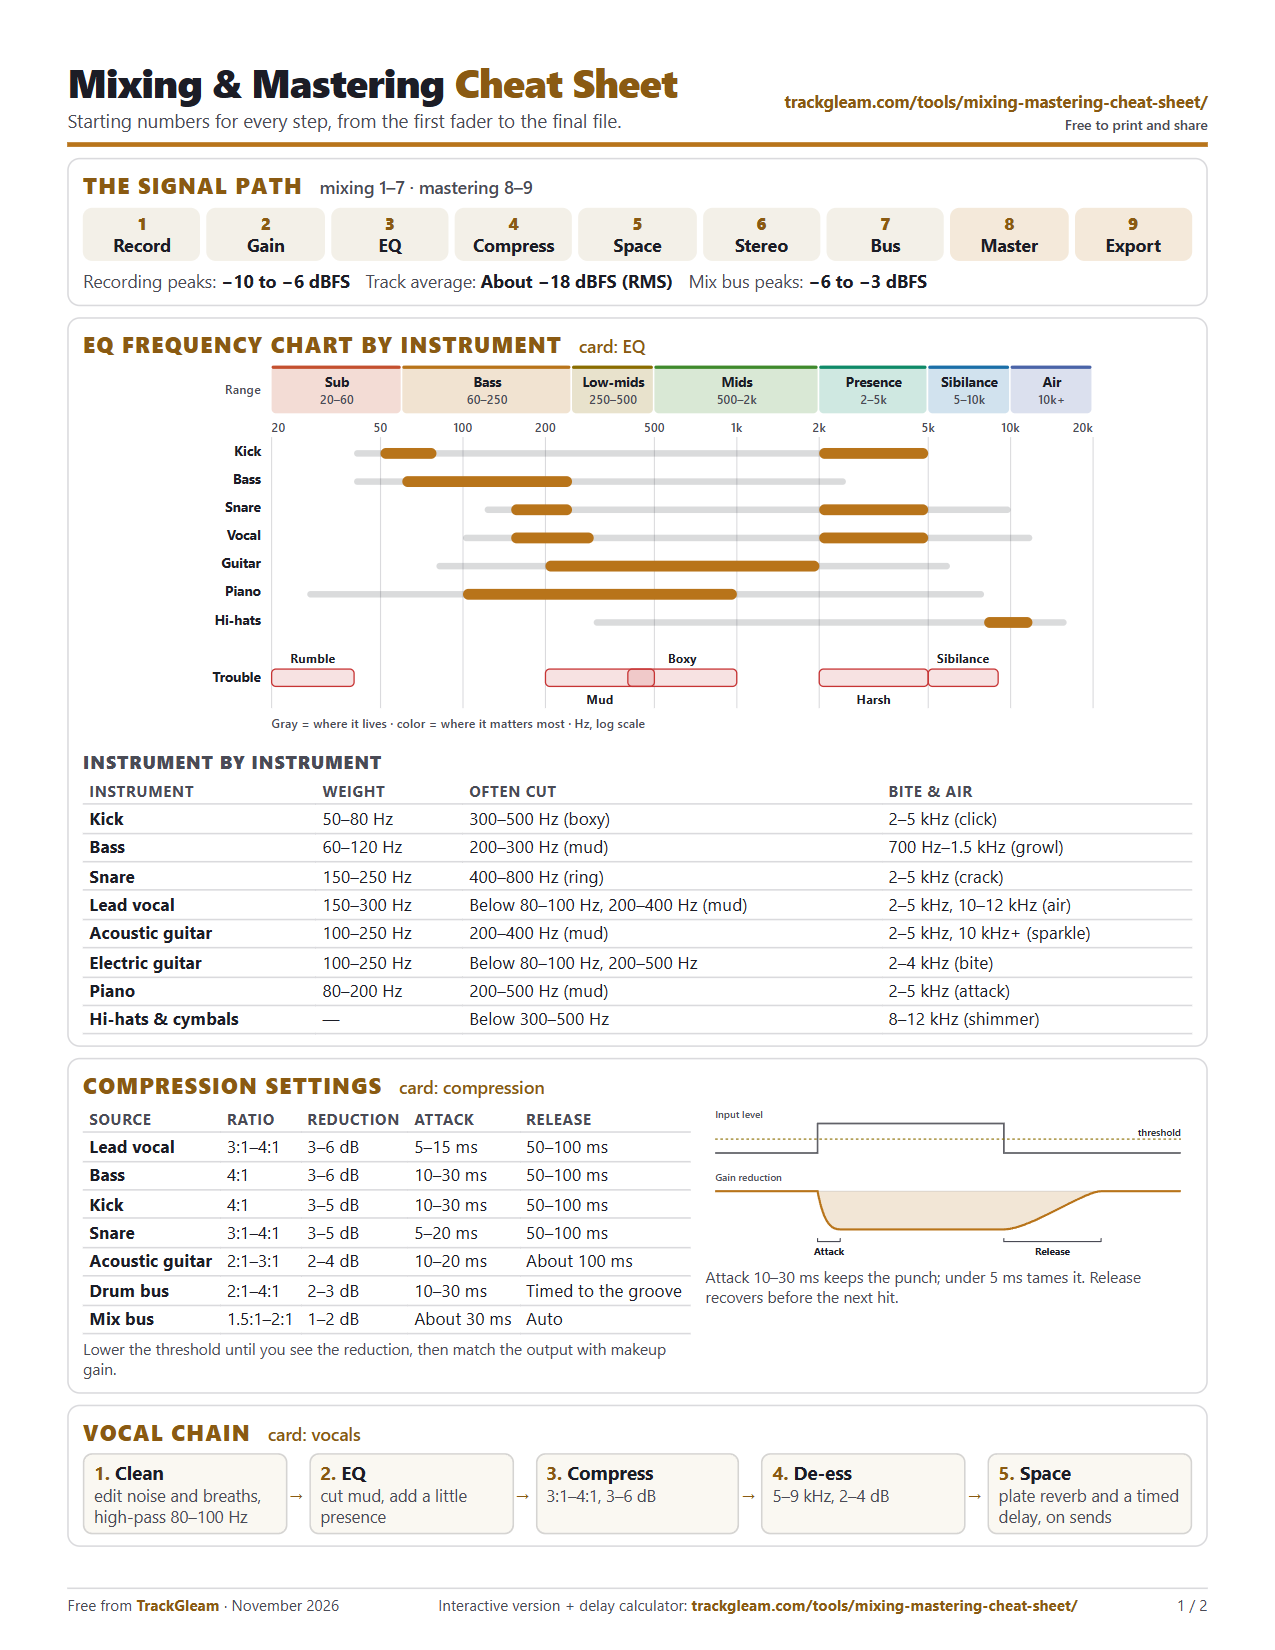
Print the 2-page PDFFree to download, print and share. Each chart links back to its card when you embed it.
Cheat sheet questions
Is this cheat sheet free to print?
Yes. Download the 2-page PDF or print this page from your browser. No email, no signup.
Do you sidechain the kick to the bass or the bass to the kick?
Usually the bass ducks under the kick. Put a compressor on the bass, let the kick trigger it, and aim for 2–4 dB of ducking with a fast attack and a release timed to the tempo.
What are good compression settings for vocals?
Start around 3:1–4:1 with 3–6 dB of gain reduction, a 5–15 ms attack and a 50–100 ms release. Two gentle compressors of about 3 dB each often sound more natural than one heavy one.
How do I work out delay time from BPM?
Divide 60,000 by the BPM for a quarter note in milliseconds. At 120 BPM that is 500 ms, an eighth note is 250 ms and a dotted eighth is 375 ms.
What order should a mastering chain go in?
A common order is EQ, compression, optional saturation, a stereo check, then the limiter last, set to about −11 LUFS with a −1.0 dBTP ceiling.
Reached the Master stop?
Gleam does the mastering stretch of this map free, right in your browser.
Master a track free →Real watermark-free WAV · nothing uploads · optional GleamAI master $1.99Prefer to read it start to finish? The beginner handbook has every chapter, or get it as a PDF.